A Tabulate sheet is formed as an array of Rows and Columns. Columns are identified using letters and Rows are numbered. When you first create a tabulation, it has 26 Columns (A to Z) and 200 Rows (1 to 200).
This arrangement gives each cell a unique reference formed from its Column letter and Row number; A1, B45, and so on.
- You can insert columns or rows on the right-click, placing your new columns or rows where your cursor is and shifting existing items to accommodate the new ones.
- Alternatively, you can add batches of columns to the end of the spreadsheet and batches of rows to the bottom of the spreadsheet, increasing your spreadsheet's overall size (from 26 columns to 31 columns, say). You can also use the Add functionality to increase the size of every sheet in your workbook by your selected number of rows or columns.
Inserting or Adding Columns
Inserting a column

- Select a Column Header (yellow box).
- Right-click Insert from the context menu (red box).
The whole column is selected in your view. Note that the gray header (containing a letter) is selected and not the Header 1 row in the spreadsheet body.
A new Column is added to the left of the selected Column.
Important: You must right-click the column header (A, B, C, D, and so on) and not one of the column cells.
Adding Columns
Adding Columns increases the width of the sheet by a specified number of columns, with the new columns being added to the right. You can either increase your current sheet size by a preset number of columns or open the Add dialog to increase it by a custom number of columns either in the current sheet or in every sheet of the workbook.
From the left-hand Toolbox:
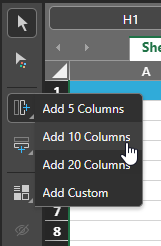
- Click Add Columns to open the submenu.
- Do one of the following:
- To add a batch of columns, select one of the Add X Columns options. Your current sheet is expanded by X number of columns.
- To add a custom batch of columns, click Add Custom and, in the Add dialog, specify the exact number of columns to add. Your current sheet is expanded by X number of columns when you click Apply.
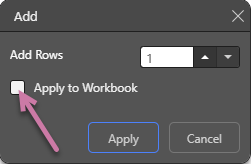
- To add a number of columns to every sheet in your workbook, click Add Custom, specify the exact number of columns to add, and select the Apply to Workbook checkbox (purple arrow below). Every sheet in your workbook is expanded by X number of columns when you click Apply.

Inserting or Adding Rows
Inserting a Row
- Click a Row Header (a number).
- Right-click Insert from the pop-up menu.
The whole row is selected in your view.
A new Row is added above the selected Row.
Note: You must right-click the row header (1,2,3, and so on) and not one of the row cells.
Adding Rows
Adding Rows increases the length of the sheet by the specified number of rows, with the new rows being added to the bottom. You can either increase your current sheet size by a preset number of rows or open the Add dialog to increase it by a custom number of rows either in the current sheet or in every sheet of the workbook.
From the left-hand Toolbox:
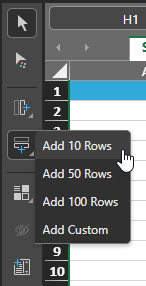
- Click Add Rows to open the submenu.
- Do one of the following:
- To add a batch of rows, select one of the Add X Rows options. Your current sheet is expanded by X number of rows.
- To add a custom batch of rows, click Add Custom and, in the Add dialog, specify the exact number of rows to add. Your current sheet is expanded by X number of rows when you click Apply.
- To add a number of rows to every sheet in your workbook, click Add Custom, specify the exact number of rows to add, and select the Apply to Workbook checkbox (purple arrow below). Every sheet in your workbook is expanded by X number of rows when you click Apply.
Deleting Columns or Rows
- Click the Column Header or Row Header for the item you want to delete.
- Right-click Delete (blue box).
The whole column or row is selected in your view.
The selected Column or Row is deleted.
Note: You must right-click the column or row headers and not one of the row cells.